If Viewing Photos were a job, Phot-Awe would keep you in a state of flow at all times.
View Photo
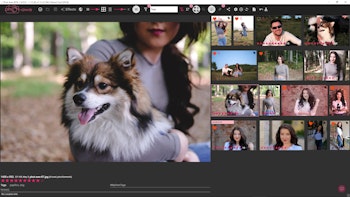
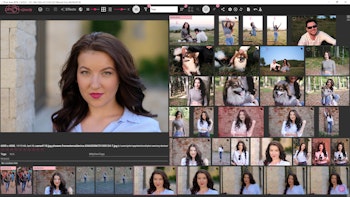
Any other software will break "flow" here. They will show you the photo full screen. Even though they'll show some decent animation of the photo being enlarged and then later being collapsed, they've broken flow - you need to remember where you were (the surrounding photos). Recovering back into that state of flow always takes time, and you can even forget if you wanted to view other photos from the current page. Phot-awe doesn't break flow - it shows you the current photo, surrounded by other photos. You can even tweak how big the current photo is compared to the rest of the photos. Click on any photo on this page, it becomes the current photo, nothing else changes.


Speed Browse
Admit it - you've taken thousands of Photos, and didn't even look at them. Too many, right? I've designed this to let you focus on your photos, as many photos at a time as you're comfortable with. You want to quickly browse through 1000 photos - and quickly identify the cool ones? Set the photo size to your liking, and go! I've actually done that in roughly 2 minutes, identified 11 cool photos and marked them as favorite.
Zooming
Once again, in all the other apps, zooming breaks flow. In fact, they break it in two ways - first, they will bring the photo full screen, and second, the zoomed area will overlap everything else. My app keeps the flow going: enter "Zoom mode". Nothing will change - until you hover over the Current Photo, at which point, the zoomed area is shown to the right. Move the mouse - the zoomed area changes - that simple. Move the mouse out of the current photo, zoom disappears. Change the current photo, hover over it, zoom takes over. In fact, you can change the current photo with the arrows, and zoom will still work. You can even change the current page (scrolling, or PgUp/PgDn), zoom still works.
Get Started

Full Screen
Even though you'll hardly have the need to go full screen with my app, it's a piece of cake. Just press Enter and we'll go on Full Screen (press Esc, and we come back). If zoom mode is ON, zoom will work, just like before. It will overlap a part of the Photo (where else could it go :) ?), but by default, it won't overlap the mouse - just so you can easily focus on what you want - the full photo or the zoomed area.
My highlights
Sure, you look at photos, set your favorites, rate them, sometimes add #tags, and/or notes. Then what? Find them with a single click! Just click on "My Highlights" in the toolbar, and we'll show you only those Photos that you've shown interest in. Wanna dig deeper? Go to Folder View - and see where they are, scattered on your PC. Or course, assuming you have many highlights, you'll like the Timeline view, where on the right side you can always jump to the highlights from a specific period of time. Or, do a slideshow - you'll certainly love a slideshow with just your highlights... OR, just enter Full Screen - Full Screen makes a lot of sense here, it's the Photos you Love!

No Wasted Space
Every extra pixel that you view just improves your experience. Find out the photos you want to view - say it's a Folder. Go to Folder View, select it (notice that you'll instantly know how many photos are there), and then, the Folder View is not needed anymore - hide it. You just want to see the Photos? Then hide the Extra Details as well. See how much space you've gained? Enjoy! Did I mention that this happens instantly?
Photo Details (enabled by default)
This shows a quick summary such as photo name/ folder/ location, without taking too much space. You can turn it off when browsing - it's there to show you the quick info you may want on a Photo, without getting in the way. You can also rate it, add/edit #tags or edit notes about the photo. To keep the flow going, type '#' (shift-f3) and we'll take you to edit the #tags. Or, F2 - and we'll take you to edit the notes.

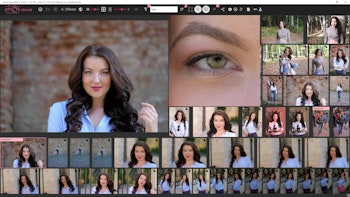
High Resolution - at all times
You got a 6000 x 4000px or higher Photo? Enjoy every detail of it, not just some trimmed down version. Use the Zoom, and see even the color of her eyes! Or go Full Screen, or Both - your choice. Got a 4K monitor? Awesome, we've optimized for 4K from day one - photos look crystal clear!
Seamless Sync
Synchronizing with your Phone/Tablet/Camera/USB Stick is a simple plug and click - just answer "Yes" after you've plugged in your device, and we take care of synchronizing all the photos you have on the Device. It's a very smart process, and next time we'll only get the new Photos. But it doesn't stop there - we've made it insanely easy to sync as many devices as you want. Each Device has its own nice Folder (in Folder View), under "My Devices". Click it and you'll see only the Photos taken from that Device. You can expand further, and each sync you've done will show up there - click it, and you'll see the Photos you've synced on that day.


"Lean" Filters
...because you don't always know what you want beforehand. Let us help you! You can gradually expand up to where you want to go - Folder-wise, Time-wise, World-wise (see below). And guess what, you can even combine them.
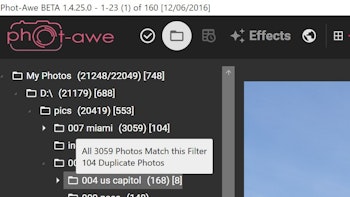
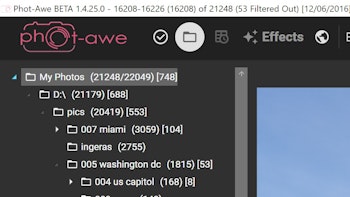
Filtering by Folder
For Advanced users, In Folder View, you always see for each Folder, how many Photos it (and its descendants) contains. You can click it, and view the Photos from itself and its descendants, or expand it further, as much as wish. And of course, they're smart - we only show you the folders with photos, nothing else.


Filtering By Time
Enter Timeline - do you always remember when you took the photos? We certainly don't! Let us visually show you when you've been photo active, from your first photo up to today. You can always choose to see the photos you took in a period of time, or expand it further, down to the day. It doesn't matter if it's 5000 photos or just 50 - results are instant. And, we automatically find "Moments" - a Moment is a small period (up to a few hours) where you've taken lots of photos, such as, a photo session. When you're timelinining, you can always expand by time or by moments - whichever you feel like. To help you even further, for each period, we also show you your highlights - from the many photos you took, which were your favorites. View all the photos you took in a period of time/moment, or just the highlights - your choice. Did we mention it's also insanely fast?
Filter By World Location
Assuming you had your GPS On when you took the photos, let us show you how the world looks, according to Your Photos! Once again, you can expand as much as you want - it's your choice. We show you previews of the Photos, and if you want more, you can always press "View in Phot-Awe" and see them big-size. And, every photo that has GPS, will have a "Globe" icon on the top-right side. You can click that, and see other photos you've taken around that location.


Combining Filters
Say you've found 500 photos you've taken in Constanta. You can see how they're scattered across time - enter Timeline. At this point, the timeline will show you only these 500 Photos - other than that, it will work like before. Or, you can see how they are scattered across your PC - go to Folder View, and each folder will show 2 things - how many Photos you've taken in Constanta out of how many Photos are there. You can expand any folder - and if you click one, we'll only show you the Photos matching the Constanta filter and that Folder (+ its descendants).
Advanced Filters
Or, you can go Advanced - and filter by Photo Size, Photo Width or Height, and so on. You can also combine an Advanced Filter with Folder View or Timeline (apply the Advanced Filter, then go to Folder View or Timeline, and filter further).

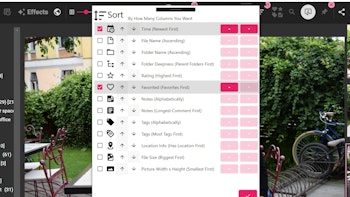
Sorting
First of All, the Sorting is taken into account at ALL times - no matter how/what you Filter. Second, you can Sort by several fields. For example, you can sort by Time and Favorites - so from each day, you'll first see the photos you like. Or, just Favorites - escape the confinement of the Time Sort ;)
Got Duplicates?
They are ignored by default. We only show you the photo just once, no matter how many times you have it. We're also working on a way to visually show you where the duplicates are - and you'll be able to easily delete them, if you wish.
Lots of Photos?
We've optimized for 25K+ Photos from the get-go. We've got customers with 60000+ Photos, and they love it! Either you want to view 50 Photos at a time, or 20000 at a time, we've got your back. Plus, by default, we automatically look for them when you launch as first time.
Interoperability
Yes, we do play nice with other apps. First of all, you're not confined to a single folder here - you can select photos from several locations on your PC, you don't need to care. Then, right click, and lets say, Copy To Clipboard. Go to Your PC, and paste them wherever. Or, just send them to another app. Send them to Lightroom, Gimp, Irfanview - you choose (yes, you can send several Photos to an app - from Phot-Awe ;)).


Advanced Selection
Say you want to select several Photos (for comparison, or whatnot), from different places across your PC/time/world. Enter Pinning - wherever you find a photo you want to add to your Advanced Selection, Pin it. This works all the time - no matter if you're in a Folder, in Timeline, in the World Map, or view the photos from a Filter.
Effects
Once again, made to keep your flow state going. You enter Effects View, and just the left pane changes. You can select the effect you want to apply, and by default, you'll preview it on all the page. You can go to another Photo, and that will become the Current Photo, while nothing else will change. You can apply several effects at once, you can even save the Effect Chain and reapply it later to other Photo(s). You can Zoom while you're applying Effects, to see the minutiae of your results. And you can compare the original with the modified photo. You can do that even while zooming - just right click on the photo! You can Save just the modified Photo (the default), or bulk Save right then (just change the "Apply Effects To" on the bottom). Or, if you've changed your mind and don't want to apply the effects, simply go to another view, or unselect the "Effects View" - that's all!

Blazingly Fast!
Did we mention everything we've explained happens blazingly fast? Everything. We don't want anything to break your flow. Enjoy!